Search This Blog

Followers

Saturday 7 March 2009

Powertrain Complete!

I received the clutch release bearing in the week and the adapter it fits onto and after some fettling managed to get the two joined together. Today's job was to get the flywheel and clutch on and mount the gearbox with the release bearing on it's lever inside. Here's a photo of the flywheel with clutch attached.


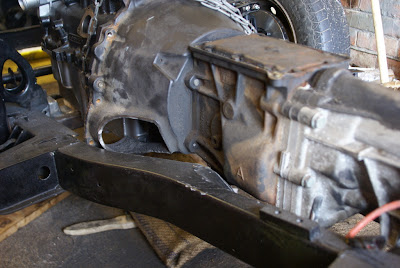
With the spigot bearing inside the end of the crank I then fitted the gearbox, propshaft, and starter motor - see below.


The propshaft (below) was built for me by a company called Bailey Morris UK Limited. I phoned them with the distance between the differential plate and the oil seal on the gearbox and the layout of the holes on the differential plate and they built me the shaft in three days for £128. It looks great. The Type 9 gearbox has splines on a shaft that goes inside the gearbox so that end of the propshaft was a smooth collar on the outside with splines inside. They make the shaft with a length that means this end goes three-quarters of the way inside the gearbox so that it can slide in and out as the engine/diff flexes.

Tuesday 3 March 2009

Plates, Pulleys, and Quick Shifting!

Like most engines, the Zetec has a plate that goes between the block and the gearbox bell housing. Unlike the one on the Spitfire engine this serves no purpose other than filling in the gaps! The plate from the Mondeo (my donor car) is designed for the front wheel drive gearbox and is the wrong shape for the Type 9 so it was tossed. (in fact it was cut up and used to make the brackets for the front Goodridge hoses!) Rather than hunting round scrap yards for an old Sierra with a plate I could buy I made one by simply putting the gearbox on it's end and drawing round it. A bit of cutting, grinding, drilling, filing, and painting and hey presto one plate was born. I'm getting into this fabrication lark!

I've bought Canley Classics' uprated 55amp alternator for this car which comes with a pulley designed for a standard V belt. The belt on the Zetec engine has 6 ridges so I need to use the pulley from the Mondeo's alternator. Here are the two pulleys:

You can probably tell that the pulley on the left uses a Woodruff key to keep it from slipping whereas the one on the right is just done up tight! unfortunately the diameter of the hole in the Zetec pulley is bigger than the thread it needs to fit on. I want the pulley to sit as true and as central as possible so I don't have drive belts jumping off and alternator bearings wearing out prematurely. My solution is to get the original pulley (left) machined down so it fit's inside the Zetec pulley and weld the two together. Talon in Yeovil (they make hubs and sprockets for race bikes) are doing the machining for me and I'll add some more photos when I get it back even if it doesn't work!

Final thing to report is the delivery of my quick shifter which I thing is ruddy cool! I've seen a Quaife one on Demon Tweaks for £75 and the one I bought (eBay!) is obviously a copy but it looks exactly the same (it's even the same shade of green!) and the quality of the machining is excellent and it was half the price.


Sunday 1 March 2009

Now and Next

So this brings you all up to date on the progress. Today we removed the gearbox and welded up all the bits of the chassis that have been cut. We also started looking at the altenator and how to fit it - another custome bracket coming up. This week I hope to get the flywheel lightened and a thrust release bearing for the clutch. I've decided to stick with the cable clutch that is standard on the Type 9 gearbox so later on i'll have the fun and games of converting the Spitfire pedal.

I've ordered and received the prop shaft which looks great (photos soon I promise) and a flange plate for the exhaust. This plate will be bolted to the engine and the pipes welded to it.

I've also got the pulleys I need for the altenator (although some machining is needed to fit it) and the water pump so the three way pulley and belt system (crank, water pump, and altenator) will be fitted soon.

I bought a swirl pot ages ago from a company called SM Engineering and I'm going to get them to build me an alloy fuel tank. I want to make it slightly smaller on the drivers side so I can accomodate the swirl pot and pumps etc next to it. I know some people fit these in the bottom of the boot which does look nice but I want this car to be practical so I intend to keep as much boot space as possible.

My number one aim is to turn the key and hear those throttle bodies purr (or shout) as soon as possible so everything I'm doing and thinking about at the moment is aimed at this. Here is a list of what needs to be done and in the rough order:
  1. Buy thrust release bearing and fit flywheel, clutch, gearbox, and prop shaft.
  2. Body can then be fitted - this will initially be done without spraying it so unless I change my mind, look out for a patchy white and yellow (and surface rust) coloured Zetec Spitfire on this years 10CR!
  3. Order fuel tank - turnaround should be a few days I am told.
  4. Order fuel pressure regulator, fuel filter, pressure guage, low pressure pump, and pipes and fit this all when it arrives.
  5. Water system: I'm currently looking at what radiator to use. I'm leaning towards a Pug 205 radiator as both the inlet and outlet are on the same side. With the water rail from raceline (already fitted) I can use the radiator without a header tank so this setup will be next on the list.
  6. Electrics will be next, ECU, ignition etc.

At this point I will hopefully be able to fire up the car. I know the above list is not all of it but it shows the basic direction I'm going in.

Check back here soon for more updates.

Brake Pipes

First job now that the car was back in it's spiritual home was to prepare the chassis as much as possible so that in the near future I can fit the body permenantly. We started with the brake pipes. All brake pipes have now been made and fitted and all goodrich hoses are also on.


Back to Mum and Dad's Garage

So it's early 2009 and if I want to use this car in this years 10CR then I really have to get on with it. The trouble with my small single garage is that every time I want to work on the car I need someone to help me lift the body off and back on again at the end of the day. I asked Dad if he would mind me taking over his (double) garage for the forseeable future so I can get moving. He is very keen to see this car on the road so he agreed. With the help of my 5 year old nephew the two of us went top get the car...


Test Fitting the Body

Just seeing the body back on the chassis was great. A fair bit of cutting of the bulkhead was needed although for some reason I never took a picture! I know these last few updates have been short and sweet and mainly just photos but I promise dear reader(s) I will try and keep the blog updated from now on with more detail.


Getting the body from Dad's Garage

One Saturday afternoon out of the blue I turned up at Dad's house and grabbed the body leaving a gaping hole in the garage!! Notice the TSSC sticker from 1988/89 - the last time this car was on the road...


Rear Suspension

The front suspension is all but wrapped up (see previous entries) apart from some final torquing etc. So in order to start thinking about the body I wanted to get the rear suspension done so I could at least roll the car in and out of the garage. Here are a few of the pics. All this was done back in May/June 2008.


Fitting the Engine

Having sat the engine down by cutting the cross member I marked and cut all the places where the gearbox fouled the chassis. We also made some cool engine mounts. See pics below.